What is sound?
Sounds are waves of air. We hear sounds because our ears are sensitive to these waves. One of the easiest types of sound waves to understand is a short, sudden sound like a hand clap. When hands clap together, they create a pressurised wave of air which moves at about 340 meters per second ( “the speed of sound” through sea-level earth atmosphere ). When this wave reaches one’s ear, it pushes on the eardrum slightly, causing it to vibrate and the individual hears the clap.
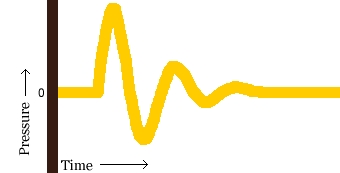
A hand clap is a short event that causes a single wave of air that quickly dies out. The image above shows the shape of the wave (“waveform”) for a typical hand clap.
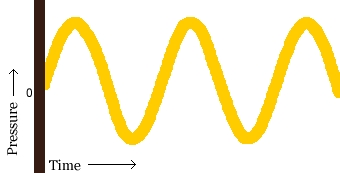
Other sound waves are longer events. A ringing bell serves as a good example of this. When a bell rings, after the initial strike, the sound comes from the ongoing “ringing” of the bell. While the bell rings, it vibrates at a particular speed (“frequency”) and this causes the nearby air to vibrate at the same speed. This causes waves of air to travel from the bell, again, at the speed of sound. Pressure waves from continuous vibration look more like this:
Both of these types of waves are called sound waves or acoustic waves.
Digital recording and playback
A microphone consists of a small membrane which vibrates when it meets these acoustic waves. The microphone translates movements of the membrane into electrical signals. Basically, a microphone converts acoustic waves into electrical waves.
If we examined the shape of an electrical wave from a microphone, we would notice that it looks very similar to the shape of the original sound wave. The following is the sound wave we saw in the above explanation:
The following is the electrical wave created by the microphone (notice the measurement for “Current”):

One could say that the shape of the electrical wave is analogous to (“similar to”) the shape of the original sound wave. This is why these electrical waves that represent sound waves are called analog waves.
Indeed, earlier methods of sound recording were themselves analog: the literal wave-shape of the original sound, as picked up by the microphone, was physically imprinted on the recording device – first in the form of soft-wax cylinders, then soft-wax master records, and finally magnetic tape where a coating of magnetized iron oxide (or chromium oxide) dust was rearranged by the sound waves. Magnetic tape became the dominant technology for recording audio as well as video and other data in the second half of the twentieth century, until the advent and rapid adoption of digital recording.
The main device used in digital recording is an Analog-to-Digital Converter (ADC). The ADC measures the voltage of an electrical wave thousands of times per second. It then uses these measurements to create a data map of an electrical wave:

Each dot in the figure above represents one audio sample. The more samples per second, the more accurate the mapping of the electrical wave.
Playback of digital audio uses a Digital-to-Analog Converter (DAC). This takes the samples and converts them back into an electrical wave. In a computer, this electrical wave is sent to a sound card’s headphone or speaker sockets and the speakers recreate the original sound wave by vibrating their diaphragms.
A computer’s sound card comes with an Analog-to-Digital Converter (ADC) for recording, and a Digital-to-Analog Converter (DAC) for playing audio. Your operating system (Windows, Mac OS X, Linux, etc.) relies on the sound card to actually handle the recording and playback, and audio applications rely on your operating system so that you can play sound files, capture sounds to a file, edit them, and mix multiple tracks while playing, etc.
Quality
Two factors determine the quality of a digital recording:
-
Sample rate: this is the rate which the ADC records samples or a DAC plays them back. Sample Rate is measured in Hertz (Hz), or samples per second. A conventional audio CD has a sample rate of 44,100 Hz (often written as “44 KHz” for short). An ‘HD’ (High-definition) DVD can have a sample rate of 96 KHz or even 176 or 192 KHz. At the other end of the spectrum, MPEG audio files intended for streaming (especially if they are only recording voice, not music) can have a sample rate as low as 11KHz.
-
Sample format or sample size: Essentially, this is the number of digits in the digital representation of each sample. Think of the sample rate as the horizontal precision, and the sample format as the vertical precision. An audio CD has a precision of 16 bits.
Higher sampling rates allow a digital recording to accurately record higher frequencies. Higher sample sizes allow for more dynamic range—better reproduction of loud and soft sounds. Both of these, of course, entail the storage of more digitial information, meaning that high-sample-rate/high-sample-size formats are much larger to store and transmit.
Audio file formats
There are two main types of audio files on a computer:
-
PCM stands for Pulse Code Modulation. This is just a fancy name for the technique where each number in the digital audio file represents exactly one sample in the waveform. Common examples of PCM files are WAV files, AIFF files, and Sound Designer II files.
-
Compressed audio files are the other type. Modern compressed audio files use sophisticated psychoacoustic algorithms to represent the essential frequencies of the audio signal – those audible to the human ear –in far less space than PCM files. Examples include MP3 (MPEG I, layer 3), Ogg Vorbis, and WMA (Windows Media Audio). Creating one of these files sacrifices some quality in order to use less disk space.
-
Thus, for example, an audio recording you make directly to your computer is often stored as a WAV file; if you transfrom that same sound recording into an MP3 file (as you can in Audacity), the resulting file will be far smaller than the original WAV file. When editing music, it is typically preferable to work with ‘raw’ sound formats such as WAV or AIFF when possible, then compress to MP3 or similar format only when you are satisfied with the mixed and edited piece.
Audacity: Installing on Linux
Installing Audacity on Fedora
The simplest way to install Audacity on recent versions of Fedora is to use the command line. You must be root or have administrative privileges to install software. There are 2 versions of Audacity for Fedora: audacity and audacity-freeworld.
The latter version includes a variety of libraries which are not part of the main Fedora repositories, so you would need to first install rpmfusion-free-release and rpmfusion-nonfree-release. In spite of these additional steps, I would recommend the freeworld version of audacity, since it will have more flexibility with file types it can work with and for export. Go to rpmfusion.org and download the appropriate releases for your version of Fedora. These represent additions to your repositories. On the command line, type
sudo dnf -y install rpmfusion-free-release...
where the ellipsis at the end needs to fit the rest of the particular version you need. For example in Fedora 26, it would be rpmfusion-free-release-26.noarch.rpm. Once you have both of these installed, then type
sudo dnf -y install audacity-freeworld
after which the assessment of dependencies, downloads and installations should proceed automatically. After installation, your are ready to use it. Simply type ‘audacity’ on the command line or find the application under Multimedia with your application launcher.
Installing Audacity on Ubuntu based systems
As there are quite a few flavours of Ubuntu screenshots are not used here however the following advice should be appropriate to most different versions.
Via the Command Line
A quick way to install Audacity on Ubuntu is to use the command line.
On the command line, type
sudo apt-get install audacity
You will need to enter your admin password to proceed.
After installation, your are ready to use it. Simply type ‘audacity’ on the command line or find the application under Multimedia with your application launcher.
Via the Ubuntu Software Centre
Open the Ubuntu Software Centre through your main menu.
Then use the search for audacity, select it and click on the Install button to proceed.

After installation, your are ready to use it. Simply type ‘audacity’ on the command line or find the application under Multimedia with your application launcher.